Monday, October 6, 2008

Still pluggin' along

Much has happened, unfortunately few pictures to show. My camera has taken a dump. I'm hoping it's just a bad battery. I have been working on the bike and things are finally starting to come together. I found a custom cafe seat/subframe through the ADVrider forum. Will save me much time and effort so I can start riding. At some point I'd still like to fabricate my own seat cowl but at least now I have something to go with.
Got everything put back together after having it torn apart. Went to fire it up and nothing. I was hearing a clicking noise and tracked it down to the starter relay. Great. Now what. Blake again came over and helped me do some electric work. I'm starting to get a better feel for it. I'd never attempted to do electrical system diagnostics/repair so this has been very helpful. Frighteningly, it's starting to make more sense. Doesn't seem to be as terrifying as it was only a couple weeks ago. After some digging on the ADVrider forum, found a picture that lead to the answer I needed. I had mistakenly connected a wired to the diode board that needed to be on the starter solenoid. Bingo. Hooked the jumpers up to the battery leads and got the engine to turn over. I still need to get it going now that I've got the air filter back on. I noticed when I had it on, the right side (if you're sitting on the bike) header was getting hot....red hot. Literally. I didn't want to run it too long because of that. I still need to cure the heat paint before I can encase the headers in the exhaust wrap.
The subframe I got with the seat didn't fit the shocks well. I'm assuming previous owner had shocks that were a bit thinner. Sucked the brackets in. Hammertime! It's amazing the tools you could use and what you actually manage with when you've not got a garage or a big tool chest. Gotta be resourceful..... Found out a 9/16" wrench was about the right size to bend the mounting bracket when being pounded with the hammer. Fun times. Shocks fell into place. Blake brought over his welder one night and filled in some cuts that had been made for more stablilty. Grinding the welds down and hit the subframe with a coat of paint to 1) keep it from oxidizing and 2) freshen it up. I do have some pics of this only b/c Blake brought over his camera. (Kids - Do not try this at home. Safetly was clearly not on our mind. I.e. Shorts, gas cans near welding flame, etc....)


Been working to determine why the headlight won't turn it (it used to??). Again, with Blakes help, did some diagnostics and found out the handlebar switch is bad. With any luck, that will get the headlight back on. In the process of shopping for the appropriate tail/brake light and turn signals. I need to fabricate a bracket for the rear lights and that should just about do it.
Actually, I still need to bleed the front brake but that's quick and easy.
Last but not least - Going to get the bike registered this week. Call up Progressive and get my insurance quote.
Vroom, vroom....

Monday, September 1, 2008

Back to the beginning...

With the bike pretty well disassembled, I decided to clean things up as I put her back together. Dropped by Home Depot and bought a dremmel and some Simple Green. Everything was scrubbed prior to reassembly. Everything looks much better but she's still an old bike and there's only so much shine I could get back (not that I'm looking for a shiny bike). You can see the difference from these pics compared to the disassembly pics. Especially inside of the front cover where all the oxidation was. Once I get everything back together, I'll probably give the engine case another once over.


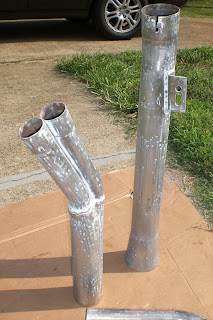
Everything back on except for the exhaust. Spent Labor day with some 100 grit sandpaper and some elbow grease. Got the pipes all shined up and then hit them with some heat paint. Have some black header wrap on order. I have a triathlon this weekend so I'm not sure how much time I'll have this week. I'd love to get the exhaust completed but we'll see. Here's how they turned out.


All that for nothing???

I post my latest tribulation on the ADVrider forum and Blake (my neighbor and bmw confidant) asks me why I didn't call him before tearing the bike down? I think to myself....."yeah, why didn't you call him????" He says it's most likely something very simple since the bike had been running before. Blake went with me when I first went to check it out and took it on a test ride. Everything worked fine aside from the parts needing replacement. He comes over 1 night to look at everything and determines the cables appear to be binding. Oh, wow, ugh......I'm an idiot. 8hrs in the hot sun could have been avoided. No biggie. This is all a learning experience for me so it was still a good exercise BUT, it would have been much easier to just replace the cables.

Call up Han's @ Hucky's and order up 2 throttle cables and a new clutch cable. Tick, tock, tick, tock.....now I wait.

**Update - Got the cables.

@$#%#!!!!!!

I'm to a point now that I'm about ready to start riding this old girl. So I thought......

Finally received the new EBC brake pads and got them installed. All of the safety issues I set out to fix when I bought the bike have now been addressed with the brakes. Cosmetics be damned, the bike should be ridable. Get set for my 1st ride. Fire her up, drop her into gear and away I go.......I should have gone. Nothing. The wheel spins when it's on the center stand but as soon as I drop it off the center stand, it's like the clutch isn't engaging. Frustration sets in. It's at this point I make the decision that something is mechanically not right. I'm thinking something in the transmission. What's the only logical thing to do at this point? Tear it down to the frame I say! And away I go..... As I start tearing it down, it's clear that this bike hasn't been maintained so well. Lot's of oxidation and in general, very dirty.


Time for some updates

Have I been slacking on the updates or what? Geez. Things have been going pretty slow frankly. Between the triathlon training and the hiccups I've run into during the bike rebuild, progress has stalled a bit.

Been a couple months since I posted anything but I have been working on the bike. I believe I left off with the front forks completed and a new package had just arrived. Well, that package contained my newest tank (I've got 3 now....the old /7, the old /6 that won't fit and the new to me small /7 tank).

Pulled off the old exhaust system and put the new 2-1 on just to take a gander. Looks pretty ugly since it's white but the overall style is cool. Also got the new tank on. I prefer the old /6 tour tank I've got but it just doesn't fit unfortunately. This tank will do the trick though. Once I have some more time and possibly a garage to work in, I may attempt moving the master cylinder to bar mount. Anyhow, here's some pics of the bike w/ the latest tank and the 2-1 exhaust as well as the NEW rear shocks...installed.


Getting closer.................

Tuesday, May 27, 2008

Felt like Christmas day...

Got home from work and what do I find but 2 big packages on my front porch. Woohoo!!! My tank and my exhaust had arrived. Can't tell you the last ime I was that excited over a couple parcels. Both came in the shape they were described so I was pleased. Nothing to do but dive right in.


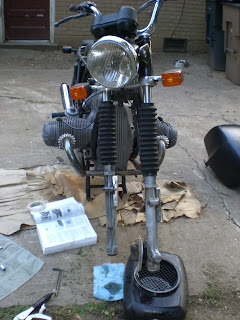
I still had the chore of the front forks. Got them off....what a pain in the ass! I had to take apart the entire steering/headlight housing. Ended up the damn turn signal supports were holding the fork braces together even with the allen bolts out. Problem solved. Forks removed.


Stuck again though. I can't get the part whose name I don't even know removed. The final thing I need to take apart I don't even have a name for. I'm pretty discourarged at this point. I think my next step will be to by a butane torch and I'm going to try to heat it all up. I'll I can hope is it helps break it away. I don't believe the front forks have ever been taken apart.


On a brighter side, I removed the original exhaust and replaced with my new 2-1 setup. It's gonna look pretty slick when all done.

I Tri(ied) and it rained

Woke up early on Memorial day (5:30am...for me....wow) so I could complete my registration and pick up my race packet. Fairly nervous. 1st triathlon and even though it was for beginners, I had trained all by myself and was there completely solo. Never had anyone show me or walk me through a transition setup, what to expect, etc. Got that all straightened away, put on my tighty speedos and went for body marking.

My goal for the day: Finish in less than 1hr. 200m swim, 8.5 mile bike, and 2 mile run. The sprint of all sprints. Even so, still my 1st.


Lining up for the start of the swim got the adrenaline going. I was #92 of 350 participants. Jumped in, got passed twice, hopped out and was in full swing. The juice was definitely flowing. Ran to the bike staging area and had a terrible 1st transition. Couldn't get my shirt on....seriously pissed me off but ended p getting on the bike and started cranking away. Felt pretty good. 3 big hills but most difficult part was the headwind for the majority of the ride. Tough. Made it through the ride and back to the staging area. Had a good transition I felt like and started running. My legs were feeling it but I didn't feel bad. Heart rate was up and just told myself to keep going. Then it was over. Came across the line, felt kinda high, and....it was over. I stuck around and cheered on some other racers. Wanted to wait around to see times and get some grub/hydration.

Times posted: 6th in my group. Total time - 54:47

Now I just need to decide if I'm going to do the McMinville tri on June 28th......


Was going to work on the bike after I got back, but it rained. Perfect excuse for slow cooking some ribs and lying around on a Memorial day.

Front fork rebuild

Another project, another learning experience.
The forks were in bad shape. Terrible bounce in them. Need new springs, washers/gaskets, oil...pretty much everything but the tubes themselves.

When I ordered my batch of parts from Max BMW (thanks for the help Rusty), I ordered Progressive springs and everything else needed. Followed the manual again and no problems to speak of. Got the front wheel and fender off. Unscrewed the fork plugs and drained out all the oil. Noticed loads of debris from both but the right more so. Pulled the lower tubes off each and the gaskets were shot; the right disintergrated. Now the tubes were completely drained. Reinstalled the lower tubes. Unscrewed the top protection caps and pulled the guide supports. Springs came right out and that was that.

Next I just wanted to pull the tubes completely out. Couldn't be completely smooth now right??? Geez...what gives? Nothing I could do could even make them budge. Had to hang up the grease rags for the day. Posted a suggestion link on advrider.com (thanks everyone there...) and got a few leads. Saving it for the next day. Spent the better part of Saturday on the project and it was much needed as I had my first triathlon (GJCC Memorial Day sprint) the following day. Good way to keep my mind off the day to come.

**Update - got the tubes out and Charles (flat track racer/mechanic extrodanaire) helped me get the damper rods out. Should have everything redone this evening. Inching closer...

Here are a few pics of the front fork rebuilt process

Oil

Sat down unknowingly Thurs. of last week and ended up changing out the oil on my bike.

Well, almost.......

Seems like nothing has gone too smoothly for me in this process. I'm hoping that I'll be laughing at myself in the not to distant future but for now, it can be frustrating.

Back to the oil change. Started the bike up and let everything warm up. Popped the drain plug and let the purge begin. Opened up the dipstick hole to speed it up. In the meantime, I pulled the outer/inner oil filter caps. Unbolted the shim and pulled the (oooooooold) oil filter. Replaced w/ new filter. Apparently BMW did away w/ the outer metal shim and built the gasket on the filter. Nice job. Less pieces. Everything still going well. Noticed the oil pan has been slowly dripping for who knows how long. Decided I want to replace it before filling back up with oil.

Here's where it gets fun. Proceeded to put back on the inner/outer oil filter caps. Many of the bolts have a torque spec. I've been follwing these guides to a T. Guess they aren't always right. Stripped out the 10mm bolt for the inner cap. #$#@$. Went to 7 different Autozone, O'Reily's, Advanced, Lowes, etc. On the 8th stop, a Pep Boys, I found one. Was about 1/2" too long but got it home and cut/filed it down and presto. Worked just fine. Tighted it snugly and left it at that. Outer cap on. Good to go. Now I just need the oil pan gasket and I'll be able to fill her up w/ some oil. One less task for now.....

**Update. Got the gasket last night and it's the oil pan is now on. She's now got fresh oil.

Tuesday, May 13, 2008

Carbs &Valves (New tires too)- 1st time for everything

I did it. I finally did some mechanichin'. My experience with the mechanical side of things has been limited to non-existent. Coming from a family of mechanical minds, this has always been somewhat of a rub to my ego. Now I can say, "I've rebuilt a carb!!!"

Bought a Clymer's manual for the bike and that's been my guide so far (Kudos to Blake Smith as well.........my neighbor who also limelights as my Beemer Mentor). Decided to pull off both carbs a couple weeks ago and sat down one Friday evening and went at it. Completely disassembled and cleaned. Replaced all O-rings and gaskets and reassembled. I'm sure the process took me much longer than a seasoned vet but I learned a great deal about the inner workings of the carbs. I also proved to myself that I will be able to do this. Putting the carbs back on was not much of a problem. Had one cap screwed on incorrectly so the throttle cable was too taught but that was an easy fix.
Next up was valve inspection and adjustment. The next few pictures show part of the process. 1st I had to remove the valve covers which was all of 3 bolts. The valves on both sides looked to be in good condition (so far so good). Didn't appear to be anything other than normal wear occurring. Moved on from inspection to actually adjusting the valves. This was the 1st part of the process I did a bit of head scratching. Finding TDC (top dead center) and feeling "good" about it were not jiving. I finally took a poke and it and......I got it. Valves adjusted on the right side. Moved to the left. Easy enough, just repeat right? Oooooooops. First mistake. Did not give rotate the engine a revolution and tried adjusting the left valve clearances. Ended up stripping one of the valve adjuster nuts. Nothing serious. Just killed about 5 days waiting for the correct parts to arrive. When I noticed that "stripping" feeling, my heart skipped a beat. I was certain I had done something very expensive. Quite the relieft to realize it was only a minor mistake. Once I had the new nut, I went through the process again, this time getting TDC for each side. This time. No problems. Another task in the rebuild process checked off the list.

Right valve - Looks good Left Valve - Ditto

Valve covers back on. Also took the rear luggage rack off. Starting to resemble a bike.
I didn't take pictures post new tires but...they're new. Michelon Mcadam 50/50's. Nice tires. Side note. I have now popped 2 new tubes putting on the rear wheel. I'm so frustrated I'm just going to have a shop put the tube in and seat the tire. Argh!!!
So far this week I've purchased a used /5 tour tank (small dent.....nothing major) and a set of low rise Euro bars. Once I can replace the current ape hangers w/ the Euro bars, it will look MUCH better.
Goal for this week is to get the front forks rebuilt. We'll see if time permits. Wedding to attend this weekend.

Tuesday, May 6, 2008

Back in Business...

1976 BMW R75/6 - Cafe Racer Project

My last bike, a burly Honda xr650l, was stolen from my backyard. Disheartening. Made it all through Central America and back with zero issues. Within 3 months back, gone.

That was then. This is now. I'm nearly back on two (motorized...) wheels again! Picked up a BMW 75/6. This blog is aimed, for now at least, to show the progess in the rebuild. Overall, she's in good shape. From initial inspection, I know I'll need the following:

1) New tires
2) New gas tank
3) Front fork rebuild
4) Rear shock rebuild
5) Carb Rebuild
6) Valve adjustments
7) All oils/lubricants drained & replaced

After I've crossed those off the list, I'll have her road worthy. Most likely won't look very pretty but she'll run strong.

Once I've gotten these mechanical defficiencies remedied, I'll begin the cosmetic stage of the rebuild process. Here are some pics of.........(name still TBD).........as I purchased her.